
-

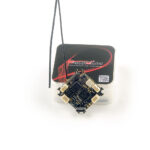
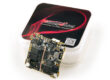
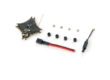
- Package list
-

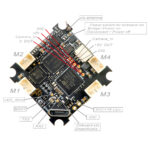
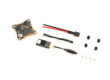
- Top view
-
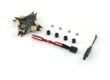
- Connection diagram bottom view
-
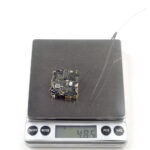
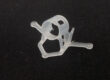
- Weight

The World first AIO 5in1 whoop flight controller built-in Expresslrs receiver is coming out now. This F4 flight controller built-in 5A esc , VTX, OSD , high performance 900MHz expresslrs receiver, it’s best for 1S Long Range and Tinywhoop.
Specifications:
| Flight controller | MCU:STM32F411CEU6 (100MHZ, 512K FLASH) Sensor: MPU-6000(SPI connection) Original whoop size compatible Power supply: 1S battery input (DC 2.9V-4.35V) Built-in 5A(each) Blheli_S 4in1 ESC Dshot600 ready Built-in Betaflight OSD(SPI Control) Built-in 5.8G VTX Built-in Serial-based ExpressLRS 900MHz receiver(915MHz or 868MHz optional) Built-in 5V 1A BEC Flight controller firmware target: CRAZYBEEF4DX |
| Onboard 4in1 ESC | MCU upgraded to EFM8BB21 Power supply: 1S LiPo/LiPo HVCurrent: 5A continuous peak 6A (3 seconds) Support BLHeliSuite programmable Factory firmware: O_H_5_REV16_8.HEX Default protocol: DSHOT600 |
| Onboard Serial-based ELRS Receiver | Operation current: ~100Ma Rx To FC protocol: CSRF RF Frequency optional: 915mhz or 868mhz(EU) Antenna connector: IPEX4 Telemetry output Power: <17dBmFirmware target: Happymodel_RX_ES915RX Receiver protocol: CRSF Could bind with Happymodel ES915TX , Frsky R9M and DIY ELRS TX module(need to flash the same version ELRS firmware) Firmware flash via Betaflight pass-through |
| Onboard 5.8g VTX | Output power: 25mw~200mw switchable Frequency: 40CH Input voltage: 3.3V 5.5V Current consumption: 300mA(type) Frequency: 5.8GHz 5bands 40 channels(include Race band)Smartaudio ready |
| Onboard voltage and Amperage meters settings | Voltage meter scale setting 110 Amperage meter scale setting 1175 |
Bind procedure:
- Supply power to CrazyF4 ELRS flight controller (Plug the USB), wait until the RX LED is off, immediately turn off the power (Unplug the USB), and then repeat the above steps again. When the RX is powered on for the third time, the LED light will start to double-flash, which means that the RX enters into the binding mode
- Insert the ES915TX module or other DIY 900MHz ELRS TX to your OpenTX Radio transmitter, and choose External RF mode to CRSF protocol, then you can find ELRS menu from the Radio system (Need to copy the ELRS.LUA file to the SD-Card tools first), Enter into ELRS and press [Bind], the RX LED on the Flight controller will getting to be solid if bind successfully.
- Receiver LED status meanings: LED solid means bind successful or Connection established; LED double-flash means in bind mode; LED flash slowly means no signal established with the TX module
Notes: Don’t make the antenna plug get touch with the Motor solder pins, otherwise it would burnt the ESC.
I have connected TBS unify pro32 and Caddx Ant Lite. In my case, I had to add an additional 10uH inductor between the FC 5V line and the VTX. Without this mod, I had massive noise and screen rolls. The camera is powered from the VTX passthrough.
Unfortunately, the 5V regulator on Crazybee F4 Lite is not able to provide current for the VTX set to higher than 100mW. It’s browning out.
Dear Happymodel,
I have bought few weeks ago Happymodel CrazyF4 ELRS AIO 5in1 F4 Flight Controller Built-in 5A ESC 5.8G VTX and ELRS Receiver for RC Drone FPV Racing – 915MHZ. I found that this board FC is very difficulty to bind with my TX16. I have used this Express ELRS receiver (EP2 915RX) to my others drone which very easy to binding with t the procedure or steps given. However this AIO 5 in 1 board make me trouble some on binding to my TX.
Therefore, please help me and guidance me on how to solve it either flashing via Betaflight passtrough or via ST-Link devices. y
Your cooperation is appreciated.
Thank you
Hey, it’s easy. Download ExpressLRS Configurator, open tha application, connect FC with USB to your PC, disconnect Betaflight (COM port must be open), select last veraion of ELRS, target is “HappyModel RX ES900RX”, select Betaflight Passtrough and do not forget on Binding phrase. When you select correct COM port of your FC, click on Build & Flash. If it fails, check settings of your Receiver in Betaflight Configurator (UART1/Rx1, mode Serial UART, protocol CRSF). Then flash your transmitter as well with the same Binding Phrase. In my case, it is R9M 2019 in TX16S. So target is different, and procedure also. You have to just build it, copy bin file to radio SD card and flash feom internal File Explorer, the target is External module.